

How To Install Firewall Grommet
How to Brand Firewall Grommet Shields
By Tony Bingelis (originally published in EAA Sport Aviation, May 1989)
Ever since the publication of my book, Firewall Frontwards, 5 years ago, I take been receiving countless queries asking for possible sources for the firewall shields/grommets illustrated on pages 64 and 66. Information technology seems that most builders would prefer using those nifty little rascals instead of sealing the firewall with a rubber grommet and some messy sealant.
Because of the difficulty builders experience in sealing the firewall, I can understand why about builders similar to employ bulkhead fittings wherever they can as the preferred way to pass plumbing through the firewall. Properly installed, bulkhead fittings do not demand any further protection or course of sealant.
Unfortunately, bulkhead fittings cannot exist used everywhere so builders keep to seal firewall openings with prophylactic grommets and dabs of silicone adhesive "frosting" effectually the wires, cables or controls passing through the firewall. This "meliorate than zippo" solution usually results in a messy advent. Besides, the handling is non fire resistant - far from it.
More than recently, a high temperature cherry silicone adhesive has become commonly bachelor at auto parts stores. Although it is capable of withstanding temperatures of 500 to 600 degrees F., it, too, falls brusque of preventing flame penetration for any length of fourth dimension.
You should realize that your firewall is supposed to act as a flame barrier between the engine compartment and you in the cockpit. As such a barrier, it ought to be capable of resisting the penetration of flames for fifteen minutes. Theoretically at least, that would give you enough time to become the plane on the basis safely.
Stainless steel firewall shields, installed around wires, cables, engine controls and through rubber grommets/asbestos washers, volition provide the ultimate protection against flame penetration of the firewall.
Sources For Firewall Grommet-Shields
First, for the tape, I do non know first manus of a reliable, readily available commercial source for those firewall shields - unless, that is, you are willing to make your own.
Both Piper and Cessna aircraft have long used firewall grommet shields (or plates as Piper refers to them). Perhaps more Pipers have more than of them installed per aircraft than do any of the other certificated aircraft.
That existence the instance, you would assume that a well stocked Piper (or Cessna) parts department should accept them, or at least be able to obtain any you need. Patently this is non so. At least not in this neck of the woods . . . and I recall I understand why.
When an aircraft leaves the establish, it is complete and resplendent down to its very new protective firewall shields screwed to the firewall. During the life of the aircraft at that place is absolutely no need to remove these protective shields. This ways it is about unlikely that any Cessna or Piper possessor would ever demand such a part. Then, why should any parts section stock them? Nonetheless, you would think they could, at least, find ane or two office numbers in their catalogs for the things and order them for you.
If you want to cheque out your local Piper or Cessna parts departments for these shields, hither are some typical part numbers yous tin can enquire for.
Cessna - Various aircraft models have these firewall grommet shields installed.
(a) Due south-352 is a common unmarried place shield.
(b) S1095-one is a ii-slice split shield (order two pieces per installation). The nuance numbers run from -i through -6 for the virtually oft installed sizes. A S1095-4, for instance, accommodates 1/two" diameter wire bundles. The larger the dash number the larger hole is in the shield and the larger the wire parcel it can accommodate.
Piper - Try this part number, PN 18321-00. As mentioned above, I think Piper calls their firewall shields "plates".
Anyway, these are the best I could come up with from my very express reference library.
My own preferred source for these firewall shields (when I can find some) is, you lot guessed it - the Fly Markets at Oshkosh, Sun 'n Fun or Kerrville, TX.
There is yet another source. I have frequently relied on this every bit a more positive source - some locally wrecked aircraft, or an shipping salvage chiliad.
Shipping save yard operators are commonly quite accommodating and will permit yous to remove what you need from i of their "junked" aircraft'southward stripped firewalls . . . and at a reasonable cost, likewise. Actually, if you are buying other parts, he may non even charge yous for the two or 3 shields you need.
These firewall shields are fastened to the metal firewall with two cross point sheet metal screws. Ordinarily, these are not stainless steel screws and they often become heavily rusted. This, of course, may make the removal of some of them hard. Don't waste product your time - go on to those easier to loosen.
If you do plan a trip to some aircraft salvage yard to liberate a few firewall grommets, accept forth a cross-point screwdriver (and a regular one, just in instance) . . . also a pair of diagonals to cutting wires and cables, if necessary.
No aircraft save performance in your area? Well, at that place is some other culling and that's what this article is really all about. Merely make your own firewall shields . . . you lot may fifty-fifty enjoy doing it.
Hither'southward how the simple technique for making these piddling grommet shields came well-nigh. A local Starduster Also architect learned from me that there was no local source, and the but fashion he could go the firewall shields he wanted was to salvage them. This was O. Chiliad. with him every bit he was making a trip to Kansas salvage yards anyway. The trip resulted in the conquering of a lot of goodies but, guess what . . . he forgot to get those firewall grommet shields he wanted so desperately.
Another trip to Kansas would have been besides expensive and then the simply normal affair for a homebuilder to do was to make his own. But . . . how?
Every bit information technology turned out, the procedure was actually quite simple and nosotros were even able to piece of work out an easy-to-follow procedure for you.
The Process
You won't demand much in the way of equipment or materials.
1. The fabric to apply is sparse (.015") stainless steel . . . a few flake pieces will do. Stainless steel is very ductile and easily formed. Do non use aluminum . . . its melting point is far lower than that of steel - something in the range of 850-1200 degrees F.
2. You will also need a large socket wrench socket, and a short slice of steel tubing that fits loosely over the finish of the socket.
iii. A small scrap slice of soft pine virtually 3/4" ten two" x 4" to be used as a redundancy block.
4. A large bench vise.
5. A pair of large metal tin can snips.
With these v pieces of material and equipment at hand, yous are ready to commencement manufacturing your own custom made firewall grommet shields.
The basic thought is to utilise both the socket and the short tubing length as dies, and your bench vise as an arbor press. You merely center the thin piece of stainless steel piece between the socket and the tubing, slip the assembly into the vise and clasp. That's about information technology.
Now for the details
Effigy 1 shows the bones shape and dimensions typical of firewall shields. You lot can make yours larger or smaller to suit your needs. The only change would be to substitute a smaller size socket and a proportionately smaller piece of tubing as dies. The forming procedure would remain the aforementioned.
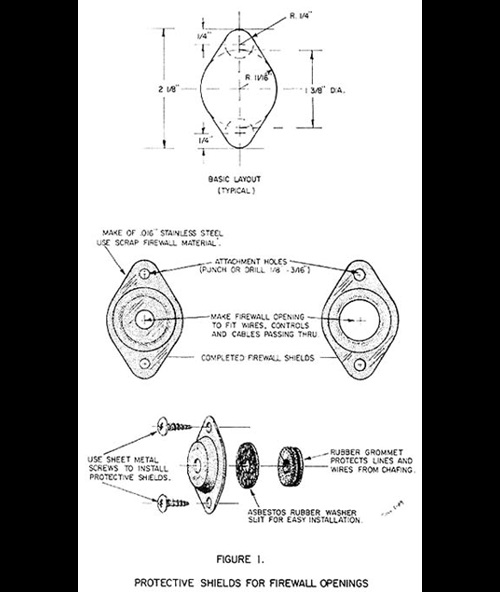
Every bit y'all can see in Figure 2 , the amount of clearance between the two "dies" determines the external shape (manner) of the formed shield.

Yous probably take already examined the photo sequence and studied the drawings so you should be familiar with the general procedure.
1. Begin by taking a scrap of stainless and holding the socket against it on one side, and the back-up block of soft wood on the other. Insert this assembly in your vise and tighten the vise until you encounter the socket actually sink about 1/sixteen" into the stainless piece. That soft wood backing cake crushes easily and allows this to happen.
2. Remove the assembly from the vise and yous will see a definite circular indentation in the stainless piece. This indentation is necessary equally it will allow you to accurately heart the curt piece of large diameter tubing over that embossed ring.
three. Place the socket back in its original position and, once more, insert the whole assembly in the vise - this time with the large tube taking the place of the forest backing block. Clasp the assembly until the socket is deeply imbedded into the stainless . . . approximately one/8".
4. Then, without removing the now distorted piece of stainless, start to straighten the distorted metal edges any manner you tin. Tapping the stainless steel part with a small hammer - using a apartment metal redundancy cake (bucking bar) held behind - is a adept way to start. Tap away until the surplus metal edges are fairly free of large ripples and waves.
five. Remove the formed stainless part from the vise and cut away about of the excess metal with a pair of sharp sheet metal tin snips.
6. Complete straightening the edges of the formed stainless piece.
7. Utilise a sparse strip of metal as a straight border and mark the centers for the installation and attachment holes. Drill the screw holes with, say, a No. 19 drill bit, or punch them out with a Whitney punch. As for the center pigsty through which the wires, cables or engine controls volition be routed, drill information technology to the size opening you lot will need.
viii. Trim and smooth the edges and round the ends of the shield on a disc sander fitted with carburundum sandpaper. This edge trimming can as well be done on a bench grinder with a fine wheel. Remember, the material you are working with is tough stainless and it can be very hard to drill, trim and shape.
Later on you get the hang of it, y'all should be able to brand one grommet shield in 10 minutes - and it will exist every bit as adept equally a mill made i.
Become ahead and try making a few - it'southward quite satisfying. You could ever give them to a builder/friend if you don't need them for yourself.
Inspecting Firewall Shielding Effectiveness
Recall, these firewall shields are to be used with rubber grommets and, sometimes, an asbestos washer behind them. The purpose of the grommet is to closely hug the wires, cables or controls passing through the firewall and protect them from beingness chafed or cutting by the sharp edges of the firewall opening and the shield as well.
To evaluate the effectiveness of your firewall shield installations, you'll demand aid. Take someone stand up outside the aircraft with a bright driblet light or flashlight that he can shine on each shielded firewall opening.
With you in the cockpit, you lot should not see whatsoever sign of light shining through any of the firewall openings. If calorie-free tin shine through, carbon monoxide and fifty-fifty flames can too get through.
In Conclusion
Talk virtually options. Now, you can effort to buy new factory made firewall shields, expect for them at the aviation flea markets, salvage them or, all-time of all, make them yourself.
My Technical Advisor this month is Wayne Tabb, Austin, TX . . . a Starduster Besides builder.

Source: https://www.eaa.org/eaa/aircraft-building/BuilderResources/while-youre-building/building-articles/engines-and-firewalls/how-to-make-firewall-grommet-shields
Posted by: futrelltwithe.blogspot.com
0 Response to "How To Install Firewall Grommet"
Post a Comment