

How To Repair Deck Stairs
Who says we have to pay a workman to repair our deck? We woman are just as capable of taking on DIY projects. I want to prove y'all how easy deck repair can be and encourage y'all to endeavor it for yourself, peculiarly if you are a unmarried woman or have a not-so-handy hubby. My deck is non that erstwhile, only 6 years, but information technology'due south starting to testify wear and tear. The kids have tripped a few times already and gotten splinters and then it was time to make some repairs.
Come on ladies! Let's get our DIY on!
 Oh my, yes that is greenish moss growing all over my poor deck. Information technology doesn't await that bad from here, only let's take a closer wait.

Yikes! Nails are all popped up. Await at those cracks! That board is barely together, just laying at that place and about to suspension off. Cracks love to form around knots in the wood. Many builder's tend to utilise the least expensive decking boards, which are loaded with knots and shorten the life and quality of the deck.
This is non safety at all.
To replace deck boards you will demand the following items:
- 3M™ TEKK Protection™ Holmes Workwear™ Safety Eyewear with String Control System ear plugs
- 3M™ TEKK™ Piece of work Tunes Ear phones or Corded Reusable Ear Plugs
- hammer
- pry bar
- miter saw
- pressure level treated deck boards
- pencil
- measuring record
- carpenter's square
- drill
- 2 inch decking screws
- 3M Advanced Abrasives sanding block
- deck stain
The first step is to remove the damaged stair or deck treads with a pry bar and hammer. Pull out any nails that might remain after removing forest.
 Some of the boards might accept a chip of endeavour to remove and you just might have to put yourself in awkward positions to get the job done. I've plant a few guttural grunts help in the procedure…
if you lot've given birth, and so I'thousand sure you are quite aware of the power behind the Guttural Grunt! (wink)
Just attempt not to scare the neighbors, ok?

For the decking stair treads, I feel it is of import to purchase premium force per unit area treated deck boards. These normally come without knots, which ways they will exist less decumbent to crevice and split. Information technology's worth the extra few dollars. Deck boards also have squeamish rounded edges. Measure the width of your stairs. Mine were 4 feet wide. Mensurate and mark iv feet on a deck board. Measure, marking and cut only ane step at a time. Similar they say, measure out twice, cut once.

Always be sure to don on your stylish 3M™ TEKK Protection™ eye wear and ear wearable. When I'yard outside in the sun I love my sunday glass manner eye wear and when in the garage or house I switch to my clear 3M eye vesture. Just my favorite new ear protection is my 3M™ TEKK™ Work Tunes Ear phones.
They are crawly!
Not only does it block out all exterior sound but has a congenital in radio and iPhone connection!
I've found them quite useful around my 4 screaming children as well. 😉
Now I tin trip the light fantastic toe, DIY, AND embarrass my kids all in 1 shot!
Information technology'due south a mother'south DREAM!

Cut your boards to length and sand whatever rough edges with a 3M Advanced Abrasives sanding block.

Were yous aware there is a proper way to lay deck boards?
Accept a look at the end of the board. See the direction of the wood grain?
You want to lay the boards down so that the woods grain on the ends await like a rainbow.
Equally the boards age they will have a natural trend to curl just a chip. You do not desire the edges to curl upwardly which leads to puddling water.
Lay your cut board on your stair treads or deck and with two inch decking screws, screw into the support beams below.
Why decking screws vs. nails?
I ever like to use decking screws, considering not only is any future lath replacement easier to remove, but screws also hold the wood in place far better than nails which tend to pop upwards over time.
Use 2 screws where ever the support beams are. Place the screws at least one inch in from the outsides and ends of the boards. If you are likewise shut to the end or edges, then you might split up the board.

When replacing stair treads, replace the dorsum treads start. This way you tin can easily see the support beams underneath.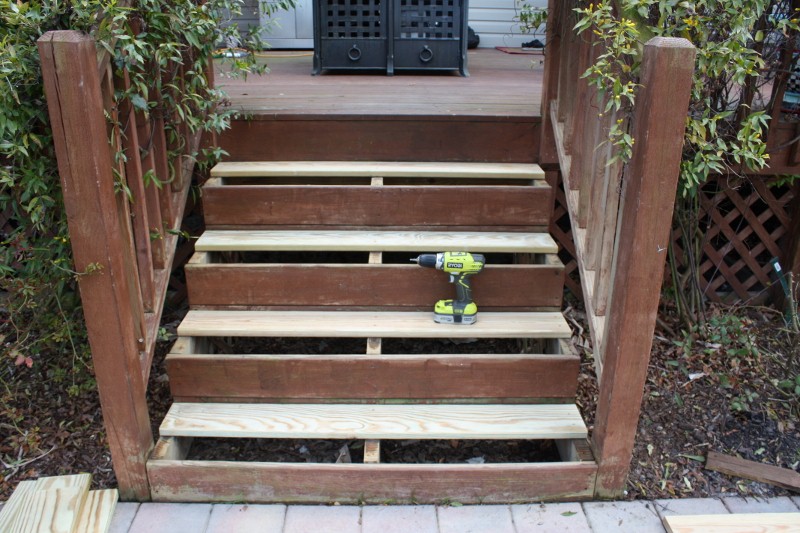
Then repeat the process with the 2nd stair treads. Push the boards every bit close together equally possible and and then screw into place. Considering nosotros are using force per unit area treated woods, no spacing between boards is needed. Pressure treated wood comes rather moist and as it dries out over time, the boards will shrink. If you leave a space between your boards now, and so afterward on y'all will have big gaps that heels can easily get caught in and cause a hazard issue.

Spruce up your posts with a decorative finial or post cap. I added these beautiful copper solar mail service cap lights. They easily attached with 2 simple screws.

Give the wood a nice glaze of deck stain to protect the deck from weather condition and UV rays and to create a rich color. The stairs are safe now and look better than the original!
I completed this entire stair tread replacement in just a few hours.
If I tin can practice it ladies, and then can you!
Boot that workman to the curb! Girl, Yous Got Skills!

Kim
You might also similar these other DIY projects:
Installing Hardwood Floors

How to Install Board & Batten with Decorative trim


This post is a collaboration with 3M™ TEKK Protection™ Brand, only all words and opinions are my own.

How To Repair Deck Stairs,
Source: https://www.sandandsisal.com/2013/04/deck-repair.html
Posted by: futrelltwithe.blogspot.com
0 Response to "How To Repair Deck Stairs"
Post a Comment